A Guide to Accessing & Downloading Your Digital PDF Sewing Pattern Files
Embarking on a sewing project in the digital realm opens up a world of possibilities, but navigating the path from purchase to creation can be a journey in itself. This guide is your compass, providing a concise roadmap to effortlessly access and download your digital sewing pattern files.
In the following sections, we'll pinpoint where to find your patterns on the website, streamline the download process, and equip you with the know-how to print at home, emphasising key settings for optimal results. Assembling your pattern pages accurately and swiftly is the final step we'll explore, ensuring your creative venture is as seamless as your finished project.
Whether you're a seasoned pro or a budding enthusiast, join us as we unravel the intricacies of digital sewing, empowering you to turn virtual designs into tangible masterpieces. Let's embark on this exciting journey together, where creativity flourishes, and precision is paramount.
Watch beginners video series here
Want to download the tutorial to your iPhone? See our guide here.
ACCESSING YOUR PDF SEWING PATTERN(S) IN YOUR ACCOUNT
STEP 1: Select 'Download My Pattern' on the menu bar.
Note, select photo to enlarge.
STEP 2: Sign in
If you're not already signed in, it will prompt you to do so.
Sign in to your account using your email address & password.
Note, select photo to enlarge.
If you've forgotten or what to change your password, select 'Forgot your password'.

STEP 3: Your Pattern Library
You will now see your account page listing your Order History.
At the very top you'll see a big pink button that reads 'Enter Your Pattern Library Here'. Select it.
Here you'll find all of your patterns listed in alphabetical order.
Note, select photo to enlarge.
STEP 4: Select Your Chosen Pattern
In your pattern library, your patterns will be listed below a search bar, in alphabetic order.
Here you can either scroll through your patterns or use the search bar. We suggest you type just one word into the search bar.
Note, select photo to enlarge.
STEP 5: Download a file
Once you've selected a pattern you will see this page. Listed will be all the files included in that particular pattern.
Select the file(s) you want to download by clicking on it.
The file will then download to your computer. It will be in your Downloads folder.
Note, selecting this multiples times will result in multiple downloads.
Note, select photo to enlarge.
Which pattern files should I download?
Depending on when the pattern was released, it will have between 2 & 5 pdf files.
- Tutorial.
- Print at Home pattern.
- A0 Copy Shop pattern.
- Projector pattern - multi-coloured size lines.
- Projector pattern (BLK) - black size lines.
Some older patterns will have the tutorial & print at home pattern together in one file. So if you don't see a separate print at home pattern file, that's why,
I can't find the files I downloaded. This is generally because your computer downloads automatically without asking you were you want to save it. Look in your downloads folder - Internet Explorer for a Windows computer & in Finder for a Mac. Just search 'Pattern Emporium'.
I'm worried I'll run out of downloads. Don't worry about the download count. If you run out because of a dodgy internet connection, just email me via the 'contact us' tab and we'll reset them for you.
PRINTING YOUR SEWNG PATTERN AT HOME
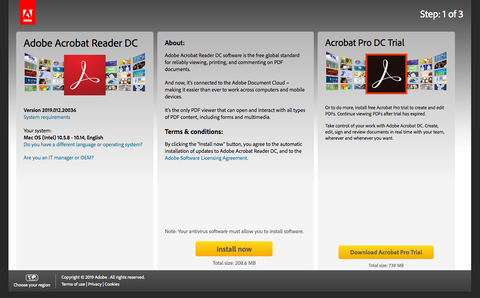
STEP 6: Get Adobe Reader:
Download Adobe Reader if you don't already have it on your computer. Here's the link: https://get.adobe.com/uk/reader/ It's a free program.
You will use this program to open & print your pdf files. You will need it on any computer you're printing the actual pattern pages from.
Desktop & laptop computers are best for printing your pattern pages (in order to print accurately to scale & to access the size layers individually). You can, however, download & read the tutorial from your tablet or phone. Customers recommend the Xodo & Sewsy app for accessing layers on a phone.
STEP 7: See What's In Your Tutorial File
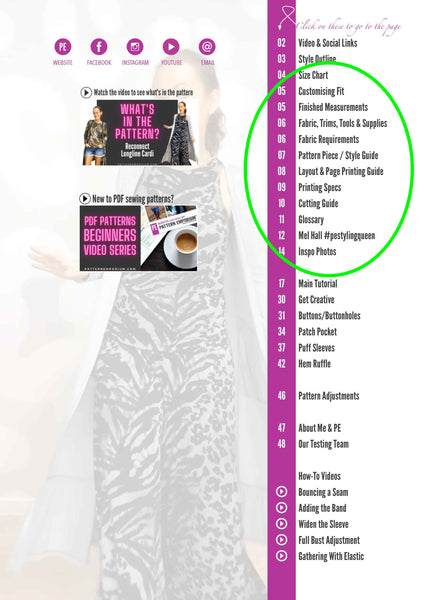
Navigate to page 2 of the tutorial in Adobe Reader.
You'll discover an array of resources to kickstart your journey, including crucial print information.
Locate the printing specs page and page guide page to initiate your printing process. No need to print every pattern page; consult the page printing table for guidance.
STEP 8: Pattern Layout & Print Guide
In some patterns you'll find the pattern layout & print guide on the same page, while in others, they are split across two pages.
The pattern layout page provides a visual guide, illustrating how the print-at-home pattern appears when all the pages are assembled.
Meanwhile, the print guide informs you about the specific pages to print for the desired style and size.
Navigate to these pages before printing.

STEP 9: Get familiar with layers
If you're not familiar with layers, this is an awesome feature available in Adobe Reader on your computer (not available on phone or tablet). It allows you to 'switch off' the sizes you don't want to print.
Again, the size layers function is only available on laptop & desktop computer. Not tablet or phone.
For more information on layers, click here. A new tab will open so you can save it to read later.
2024 UPDATE
In the newest (2024) version of Adobe Reader, the layers panel has moved. It can now be found on the top right hand side.
Can't find it? We explain how to find a missing layers icon here.
AN EXAMPLE
To use layers, you will need to know what size (or sizes, if you're multi-sizing) you need, before you print.
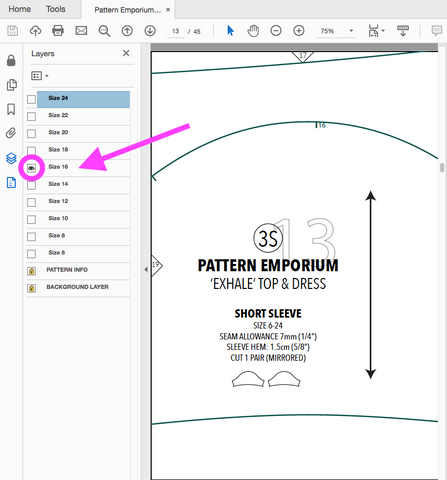
Pictured below is a pattern page with all sizes, followed by the same pattern page with all the layers turned off except size 16. Note, this is the older version of Adobe Reader with the layers panel on the left.

STEP 10: Let's check up your printer settings
So that your pattern prints to scale, it's important to have your printer settings correct.
Once you open the print box (file > print) you will have the following options:
PAGES TO PRINT: Write in the page numbers you actually want to print. Most of the time, you don't need to print them all. See the guide in your tutorial to help with this.
PAGE SIZE & HANDLING: Here choose either 'Actual Size' or 'Custom 100%'. Then deselect (untick) 'Choose paper source by PDF page size'.
ORIENTATION: Choose 'Auto Portrait/Landscape'.
PRINT: Select the print button.
Click on image for close up.
JOINING THE PATTERN PAGES TOGETHER
WHAT WILL A PRINTED PATTERN PAGE LOOK LIKE?
PAGES: When you print out your PE pattern pages correctly, you will see the colour pattern lines neatly contained inside a rectangle (border) on each page.
TRIANGLES: You will also see a little triangle with a number inside along some edges. These are to help you join your pages together accurately.
LAYOUT SUMMARY: In most tutorials, you will also find a Pattern Layout Summary that shows you what the pages look like, all stuck together.
IS THERE A SPECIAL WAY TO JOIN THEM TOGETHER?
PROBLEM: Our home printings aren't always that reliable for accuracy. Sometimes pages print out and don't align as precisely as we'd like them to. This is especially true for ladies wear because of the large number of pages we print.
SOLUTION: First join the pages in separate rows. Then, once all the rows are complete, you can stick those rows together to create the whole pattern.

TO TRIM OR NOT TO TRIM:
TRIM: Trim along the base & right of each box. Then align along this line, matching the triangled number with it's pair, on a flat surface in the order outlined above.
NO TRIM: Click HERE to watch our video for a quick & easy method that i use that requires no trimming. This link will take you to the Pattern Emporium YouTube channel.


